


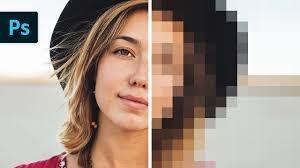
How to smooth skin in Photoshop
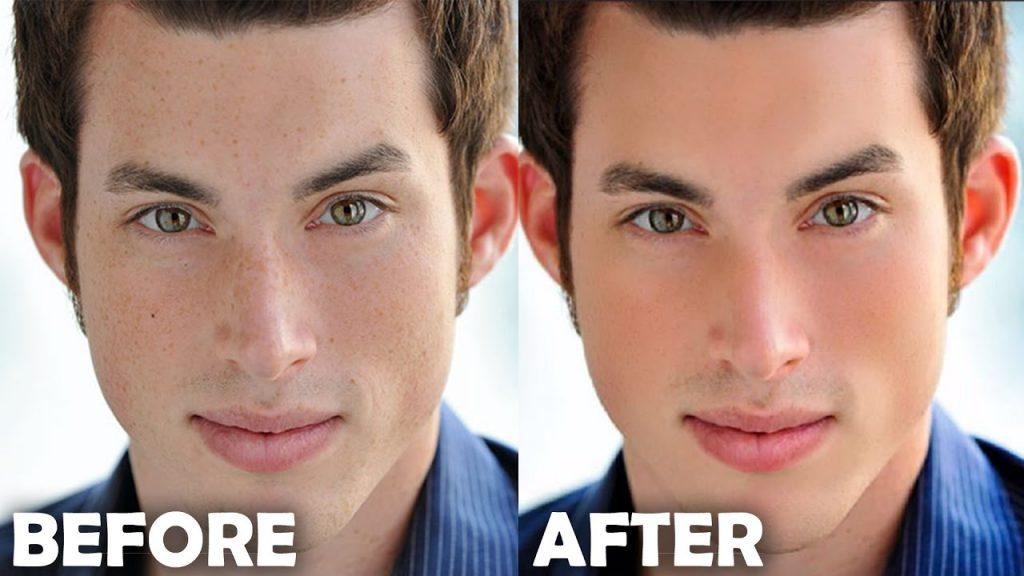
How to Smooth Skin in Photoshop; We’re going to show you how you can create a high-end skin retouching and Photo smoothing effect in Photoshop and then show you a really quick tip on how to get the perfect white balance in your photos to really bring out those colors in your skin tones.
A real quick tip on how to get the perfect white balance so we bring out those colors in your skin tones & Photo Smoothing now this is part of a mini-series all about really has we enhance your portrait photography.
What is Photo Retouching?
Photo Retouching is that the process of altering an image to organize it for final presentation. Retouchers typically perform actions that are small localized adjustments to a picture. Usually completed after globalized adjustments (such as color correction), retouching is that the polishing of a picture.
Once the white balance, cropping and color profile has been created a retoucher will specialize in adjusting other elements of a Image
.
How to Smoothing Skin
The first thing you want to do is find an image that you want to create a kind of high-end skin retouching and smoothing effect so, if you want to use any of the images.
You’re going to learn two powerful skin softening techniques. Both of these techniques are nondestructive, which means that you’ll be able to come back and make adjustments to your edits at any time. But most importantly, these methods leave the skin texture intact, which will give you beautiful smooth skin without it looking too soft or too fake.
Step 01: will take advantage of a brand new feature of Photoshop CC.
We’re simply going to press Ctrl J, Command J on the Mac to duplicate the layer. This step is not really necessary, but it will help us show you a before and after when we’re done. Now, before you smooth the skin of any portrait, what you have to do is remove large blemishes that the skin smoothing technique may not get rid of. If you zoom into your portrait, you may see some larger distractions. She, actually, doesn’t have too many. Maybe this one here, maybe this blemish there. It’s not a lot, but we’ll remove it now.
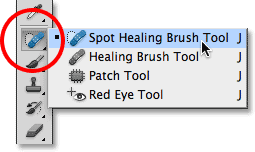
That way, things are much easier when we apply the skin smoothing technique. So, what you want to do is create a new layer. To work nondestructively, we’re going to make all our adjustments in this layer. I’m going to rename it and we’ll call it spot healing, because we are going to use a Spot Healing Brush tool. With that layer selected, go into the Spot Healing Brush tool found in the tools bar. Make sure that sample all layers is selected, and before we actually start working with it, we want to show you one thing.
We’re going to use the right bracket key on the keyboard to make the brush larger. You can see the preview there. That shows you how big your brush is. If you don’t see that, that’s because the Caps lock key is enabled. So, if you see a crosser, like that one, just tap on the Caps Locks key to disable it, and the brush preview comes back. we want to show you is how most people work with this tool.
Most people, uh, just work with this tool with the normal setting. Notice that the mode is set to normal and that just means that Photoshop samples pixels depending on where you paint. And in most cases it does a really good job. Unfortunately, if you zoom in, you’ll notice that sometimes it destroys the texture of the skin, and that’s because we’re targeting all pixels, and usually, we don’t want to do that. We want to target specific pixels.
Select Spot Healing Brush Tool
Select your Spot Healing Brush tool. Then in the mode, select either darken or lighten. The mode that you select depends on the blemish or distraction that you’re trying to remove. If the distraction is darker than the skin tone, select lighten. If the distraction is brighter than the skin tone, select darken. So let us show you how this works. We’re going to click on lighten, and just going to start removing some of these distractions. We’re not destroying the highlights of the image, we just removing the darker pixels. So we’re removing the darker blemishes and keeping the bright areas, which will allow me to keep the skin texture. to double-click on the Hand tool to fit the image to screen, and we just remove some of the darker blemishes in the image fairly quickly here. showing you just in case your image has larger blemishes that the skin smoothing technique will not get rid of.
We’re just removing some of these blemishes. That’s the before and the after. Really quickly, we were able to clean up her face. We zoom into the corner of her mouth, and there’s a white spot there that want to remove. But watch what happens. With that same technique, if we make my brush a little smaller with the left bracket key and tap, it will not remove that distraction because it’s brighter than the skin tone.
Why Use Photoshop for Smooth Skin?
Knowing how you will smooth the skin in Photoshop is a useful skill for any photographer. Photoshop is one of the simplest editing programs to create flawless yet natural faces.
Once you know how to smooth the skin in Photoshop, you’ve got precise control over every aspect of editing, and there are many tools at your disposal to realize a good kind. You can twist the skin of any subject in Photoshop so that you can also make it as natural as you want.
There are many reasons to smooth skin in Photoshop. For many, it is an aesthetic choice, especially when it includes photographs of important events such as weddings and graduation. People want to remember instantly, but not necessarily wake up on their big day.
Everyone is different when it includes Photoshop editing preferences. While some people prefer a comparatively natural look, removing only glare and wrinkles, others prefer a more heavy-handed approach. The use of smooth skin in Photoshop in Hollywood has made the airbrushed look more popular for everyone recently.
The Best Tool to Soften Skin in Photoshop
The Healing Brush
Two of the commonly used Photoshop tools for editing portraits are the Healing Brush Tool and hence the Spot Healing Brush. Both can help you touch the skin in Photoshop by removing imperfections such as scars, acne and wrinkles. These brushes work by changing the color to match the surrounding pixels. While the Spot Healing Brush is perfect for small spots, healing areas may require a Healing Brush in larger areas.
When using a healing brush, you should keep the dimensions small so that you can make changes with accuracy. If you overlay the brush, the spot edit can make itself look unnatural or out of place. You should reduce the hardness of the brush by about 50% so that your changes are found naturally in the image.
The Clone Stamp tool

The clone stamp tool works during the same thanks to the Healing Brush and takes into account each other among Adobe Photoshop’s more basic repair tools. Although the Healing Brush adjusts tone and color, however, the clone stamp tool duplicates elements around a sample selection. You will choose a neighborhood of skin from one area of the face and apply a similar color and texture to other areas.
Blending Modes
Photoshop offers a proliferation of ready-to-use blending modes that will help you make your skin smooth and supple. Sometimes, applying a blending filter is all that is needed to melt the skin.
It has several dozen different blends, but one of the most popular is Photoshop’s Gaussian Blur filter. Drag the Gaussian Blur to the slider for the picture when you are smoothing the skin and it will help to offer the healthier “glow” that we often do with magazine models.
Layer masks
Clicking the Add Layer Mask icon on the Rock Bottom of the Layers panel allows you to make changes to a photo or skin without accidentally destroying it first. Most Photoshop editors use a transparent layer to work on a photo, with the ability to detect the image below. It is best to use a layer mask for major changes such as spot blending and adding filters.
Steps to Smoothing Skin Using Photoshop
There are many different ways by which you will create a silky smooth look in Photoshop. This is often a simple method for beginners and professionals that lead to natural looking skin texture in Photoshop in just a few steps.
Reverse the colors
Our step 1 is to create a replica layer to preserve the first image in Photoshop. Then go to the Photoshop adjustment tab and flip the colors over. (Image> Adjustment> Invert) Finally, under the Layers panel, select the blending mode labeled Vivid Light. You should be left with just the bare details of the face highlighted and in shadow.

Filter the image
In Step 2, run the Filter tab in Photoshop, navigate to Other, and click OK on High Pass. (Filter> Other> High Pass) This is often a foothold detection filter in Photoshop that will help define key boundaries around your image. To stay soft, set a radius between about 20 and 26. The larger your photo, the more radius you set.
Add glow
You should find yourself in Photoshop with an image on the verge of its origin, but heavily blurred. In Step 3, to facilitate a healthy glow, return to the Filters tab, navigate to Blur, and add a Filter Blur Gaussian with a radius between 2 and 4 (Filter> Blur Gaussian)
Add a layer mask
The last step is to feature a layer mask above your image. With the latter mask, you will confirm that you will employ the Photoshop Brush tool to shine on any problem areas. In step 4, you want to use a light touch while doing this to make this layer feel natural.
You can change the comb shape settings within the panel to melt its smoothing effect, including hardness and opacity to about 50%, flow to 100% and normalizing mode.
Tackle Low Frequencies
Once you eliminate any defects, you will specialize in correcting discoloration. Select the low-frequency layer and open the Fast Mask panel. Once you have selected the low-frequency layer, run to the selected areas and click OK before turning the foreground color black.
Using the comb tool, select the option with comb feathers with hardness 0. Paint on areas of concern, such as round eyes, lips, and foreheads. Now you will edit each of them separately, so that there is a reasonable amount of blurring. It helps to bring out the complexion and gives a youthful skin feel.
How to Avoid Losing Detail
Although Photoshop editing can be a popular thanks to lightening skin tone and improving the look of portraits, it can do more harm than good if not used properly. When the skin is more airbrushed in Photoshop, it can give photos an “uncanny valley” quality, which makes many people feel unstable.
You can achieve a soft, natural-looking skin texture in Photoshop by sticking to tools like the Clone Stamp. It copies both color and texture during touchup, allowing you to discover features like pores. If you use a healing brush, you should limit yourself to working in smaller areas to realize a more natural and even result.
If you are worried about missing detail, be sure to take an easy trip on your afterburner and filter. While tools like Photoshop’s Gaussian Blur can help create a softer appearance during a new layer, higher settings can cause the entire image to look fuzzy or blurred. If you are using a filter during a new layer, be conservative in how to apply it.
Additional Question
Here are additional question for how to smoothing skin in Photoshop
.How do you smooth baby skin in Adobe Photoshop?
Babies naturally have a soft skin texture that does not require much Photoshopping to look smooth. Typically, you have not found repair equipment to use to heal your baby’s skin. It is usually easier and simpler to have a low-level filter blur the image so that it appears softer or has a smaller brightness feature.
.Is there a plugin for smoothing the skin in Photoshop?
If you are making new editing or just want to save yourself a lot of it while smoothing the skin, you will use a hardcore Photoshop plugin to give a flawless yet natural look to the portrait. One of the most widely used is the Beauty Box Photo Plugin, which automatically detects and develops skin tones.
Related Topics