


How to fix Water Damaged Photo Restoration
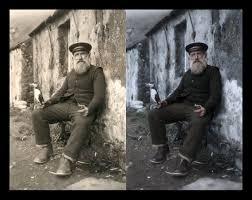
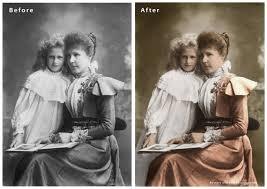
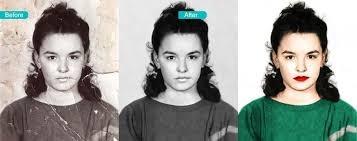
Fix Water Damaged Photo Restoration: Photo Restoration of old photos which get damaged could also be from any reason is sweetness for the savers of memories and love. It’s like giving shelter from the dried sun under the shade of the genealogy. The hopeless photos that look torn and damaged are often easily restores with the assistance of photo restoration services. the images captured earlier memories which are a part of the sweet and wonderful moments with the family and friends are always attached to the guts of the people and that they would always wish to accept them till perpetuity.
The more they connected with the partner of the photo the greater they attached with the memory of the photo which might always be not but a treasure for them. The photo restoration is a useful service serving the requirements of all the uses of memorable moments to revive those valuable and scarce occasions. Earlier in that the time when there’s no camera and therefore the photography is completed on the printed paper which is stored within the photo album or within the printed paper that lived for a very short time span. The photo albums were the sole thanks to making them undamaged. The varied sorts of damage are listed below.
Open Image on Photoshop
Select the Restarted Image & open Photoshop.
In Photoshop, choose File→Open.
Or press Ctrl+O (Command on the Mac).
The standard Open dialog box for Windows or the Mac OS (operating system) appears. The layout of the dialog box differs slightly between the two.
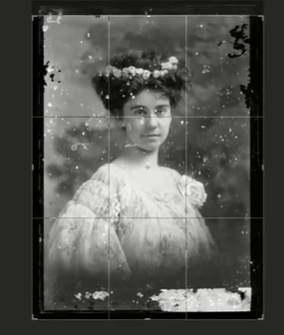
The first thing we do is take my image layer and convert it to a smart object. In essence, what’s happened is that my original image layer has been placed inside say a clear plastic wallet. So you could write on the wallet you can you know stretch the wallet. You can do all manner of things to the wallet but the image inside is safe. The next stage for me is to crop out any edges of the photograph which we don’t wish to restore.
Photo Restoration to Crop Tools in Photoshop
Now within the crop tool as a quick thing to mention there is the straighten tool. Now in the case of this image, We don’t need to use it but if you were using say an
The image that you’d scanned in that had gone slightly skew whiff. You can click the Straighten tool drag along the edge that you want to be straight and Photoshop will straighten the image based on where you’ve dragged that line.
As we say we don’t need to use that on this image but it’s a good tool to use. So The Crop Tool understandably crops your image but again by default on the Whole destructive non-destructive thing by default Photoshop leaves delete cropped pixels ticked. And that means that if you crop out an element and then you go actually We think We cropped a little bit too much and you try and undo that crop, that original information that’s been cropped under these lines will be gone. with that ticked, this stuff above the line would just be gone.
So we want to unstick that because then as many times as want to I can change this crop later on. with our crop tool in Unconstrained mode, we crop our image in to remove the black border that I don’t Want.
Fix Water Damaged Photo Restoration to Use healing Brush tools
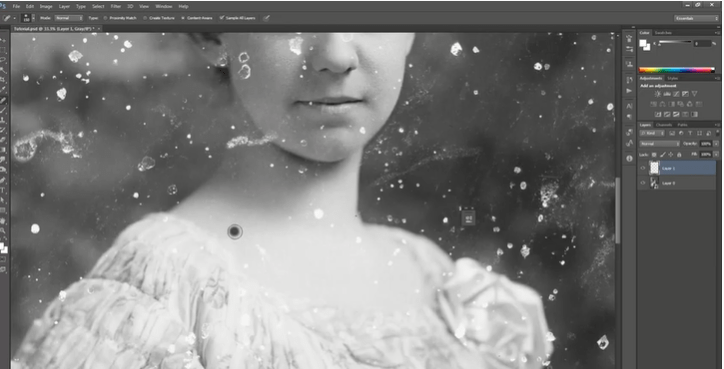
Now we truthfully tend to use the main Healing Brush tool more than the spot healing brush tool because you can very quickly sample a nearby spot and that way you don’t have to change tools all the time. This is also very useful when you find something that’s a little bit trickier to fix. So sometimes you may need to entirely replace part of the image.
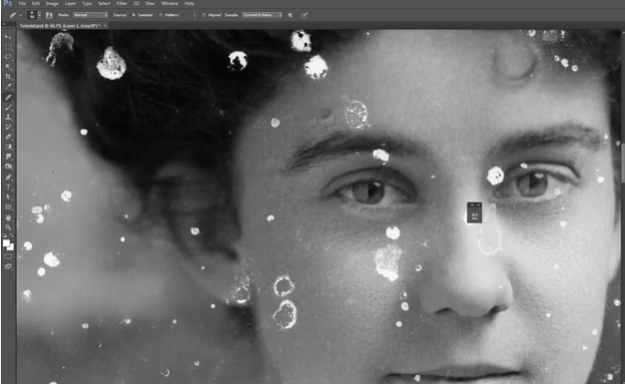
Let’s say for example this eye was entirely missing. The best thing to do would be to replace it with the existing eye. The problem obviously is that if we were to sample this eye and then paint it in. What you would find is it looks really strange because obviously the eye isn’t facing in the right direction and it’s flipped the wrong way and all that kind of bad stuff.

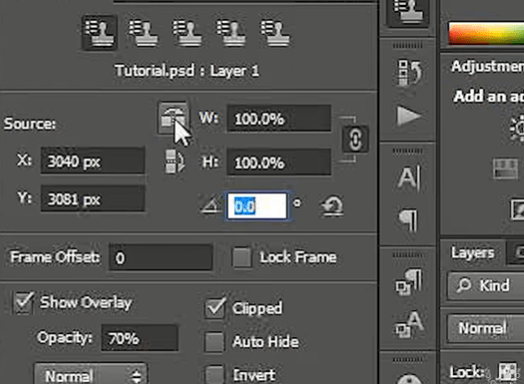
So what we could do in that circumstance is go up to window, clone source and now we can modify this image to make it look different. for example, the first thing can do is flip it. now it’s facing in the right direction.
Obviously, though it isn’t curved enough so what we can also do is change the angle of the duplicate. with that adjusted, we now have an eye that would look correct. So now if we paint that in, it looks a lot better than it did on the previous attempt. for us, there’s one area where the Healing Brush tools tend to make mistakes and that is with the edges.
The Healing Brush Tool
Say we sample here and then we try and paint out these black spots. What you’ll get is a big black smudge and that is because what it’s doing is sampling both from the image. We can see here and from the black border that we cropped out earlier. Now of course you could have deleted that cropped border with the delete pixel area in the crop Settings but the problem we find is that sometimes Photoshop will get confused and think that that area is still there even if you’ve told it to delete it.
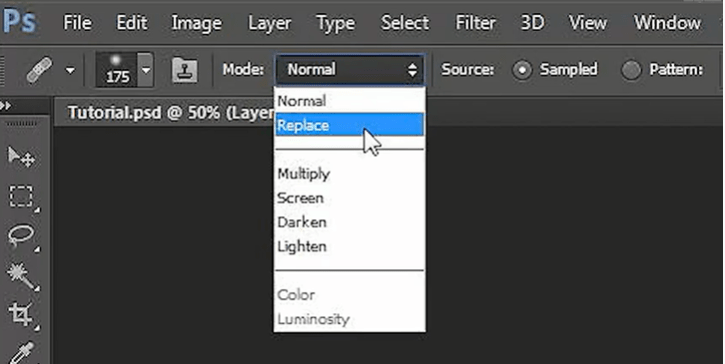
Therefore when We have an issue like this what We tend to do is go up to my mode on our healing brush tool and change it to replace because under normal it’s trying to blend the colors but under replace it’s literally taking an area and copying and pasting it. So there we go it’s not as good because obviously, it’s not blurring the pixels together but in real terms for edges, you don’t tend to notice, and if you change it back to normal. You can go back over some of these areas and it will blend them through. Now using only the methods that we’ve just shown we are going to repair the rest of the face while you watch. So with the Healing Brush tool selected some of this is obviously fairly straightforward such as these spots here there we go.
Photo restoration and Smooth out Photoshop
Even some like this area under the eye where you can see there’s a gradual gradient aren’t going to be too tricky as long as you choose in the right spot. As you can see these tools are very good at adapting for the most part. It is all really about just finding an area that is the same brightness and then painting that in and as with the edges they’ll be the odd area where you’ve got really high contrast and the best thing to do is to replace those missing areas with surrounding details just sampling as you need a different piece and then if necessary go over it quickly with the tool in order to smooth it out.
fix Water Damaged Photo Restoration: We actually find this process very therapeutic to do. Now any area such as the edges where you have these high contrast black and white differences is going to cause some problems for the healing tools. So again in those cases, we tend to switch to replace mode and just replace what we need to so that the other tools can work correctly.
We’ve done that you can see there’s a slightly rough edge but if we switch back to normal mode We can now go over these bits a little bit and patch them.
Carefully Photo Restoration Eye smooth in Photoshop
Now sometimes you have a spot like this eye where it takes you a few seconds to work out the best way to fix it. In this case, the high contrast white against the others is going to mean that most of the simple patching tools won’t be able to do a great job. So the first thing We are going to do is go to Replace mode on my Healing Brush tool here and gently and carefully replace what We can from the surrounding area.
We may need to go over it again to smooth it out of it but it will allow some quick repairs which will repair most of the issues. Now ideally like this edge here to be a little softer so if We switch back to normal mode and just paint in there you’ll notice it softens it out and I can go back over these various bits here that look a little strange and patch them until they don’t, there go.
Photo Restoration of Dust busting Photoshop
At this step, it’s better to ascertain the image in Zoom. In Toolbox choose the Brush option and take a soft round point. Make the foreground color of the image white and mark it by pressing black Smart Filter. After doing this you’re allowed to fill the entire dust and scribe mark damage.
This type of filter cannot fill all little dots and scrapes slovenly. it’s also impossible to enhance the entire little objects and spoils at the garments elements and face skin at this level. that’s why if the editor wished to urge skills to revive an old photo and the way to avoid thick scrapes attend the Layer Panel, then click New and choose the tool Layer. After clicking OK the new layer is going to be created, where we will deal with some big spoils in the foreground.
Photo Restoration of Patch the scratch In Photoshop
This is one of the foremost important steps, which deals with all types of damaged spots within the image. Each photo retoucher, who wants to find out everything about the theme the way to restore old photos in Photoshop professionally, must know the procedure of scratch removing. within the instrument Patch choose the choice Bar.
Stay here and attend the Content-Aware. Here you’ve got to state Very Strictly within the Adaption option. Mark Sample All Layers. Press Layer 1 then mark the place around the scratches. With the assistance of the cursor choose the right section. The part you chose will fill a base patch and as such how the pixels during this area will mix with one another.
If you desire to perfect the composition of the entire details, which may be a touch wrong, use the Clone Stamp instrument. roll in the hay in Sample Current & Below panel. Press Alt to undertake the neighboring clear detail and pulverize to expand it around the patched section.
- Read More –
How to Remove an Object in Photoshop CS6 | Clipping Path Client Inc.
How to Make The Background White in Photoshop CS6 | White BG
Fastest Way to Remove White Background in Photoshop | Clipping Path
How to Deselect in Photoshop | Step By Step | Clipping Path Client
How to Outline Image in Photoshop | Clipping Path Client
Remove Background In Photoshop 2020 Online – Remove Background