


5 Tips of Remove White Background in Photoshop
Photoshop is a versatile and powerful tool for image editing, and one of the most common tasks in image editing is to remove the white background from an image. Whether you want to place an image on a colored background, create a transparent logo, or simply remove unwanted white space, removing the white background in Photoshop is a skill you should master. In this article, we will provide you with 5 tips to remove white backgrounds in Photoshop.
Use the Magic Wand tool
The Magic Wand tool is a quick and easy way to remove white backgrounds in Photoshop. Simply select the tool from the toolbar, click on the white area you want to remove, and hit delete. However, this method may not work well for complex images with a lot of white areas.
Use the Background Eraser tool
The Background Eraser tool is a more precise way to remove white backgrounds in Photoshop. Select the tool from the toolbar, adjust the brush size, hardness, and tolerance, and start erasing the white background. This tool works best for images with a distinct foreground subject.
Use the Pen tool
The Pen tool is a powerful tool for selecting and isolating objects in an image. Use the Pen tool to create a path around the object you want to keep, and then use the Path Selection tool to select the object. Finally, invert the selection and delete the white background.
Use the Layer Mask tool
The Layer Mask tool is a non-destructive way to remove white backgrounds in Photoshop. Duplicate the layer, add a Layer Mask to the duplicate layer, and use the Brush tool to paint over the white background with black. This will mask the white background while keeping the original image intact.
Use the Select and Mask tool
The Select and Mask tool is a powerful tool for selecting and refining complex objects in an image. Use the tool to select the object you want to keep, and then use the Refine Edge option to fine-tune the selection. Finally, invert the selection and delete the white background.
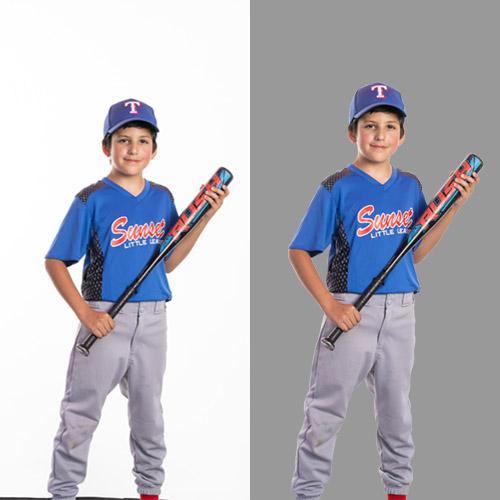
Remove White Background in Photoshop
Want to remove the white background in Photoshop? Do it yourself. It is effortless and straightforward. Use any location for your photo and select it. You can make it transparent or cut an object to connect it.
However, there are several ways to remove the white background in Photoshop. This means several tools to select an item in an image. In this article, I will try to explain and illustrate the five best methods to remove a white background and replace it with a solid color or place an object in another image. I also give tips on “when and how to use these tools for the perfect result.” So dig deeper.
Remove White Background in Photoshop
In the Remove Background tutorial, we learned how to Remove White backgrounds in Photoshop. Now we will learn how to make the background transparent by selecting these Photoshop tools to use the element in any design with only the background image. Alternatively, we will learn how to Remove White Background in Photoshop.
Here is the process of Remove White Background in Photoshop
Using Pen Tools-
- How to remove white background in photoshop with a pen tool
- Quick selection tool to remove white background in photoshop
- Use the Magic Wand tool to remove the white background in photoshop
- Magic Eraser Tool- remove the white background in photoshop with the Magic Eraser tool
Remove White Background Photoshop tools.
Removing the White Background in Photoshop isn’t that difficult. If the BG is white, it can be easily removed. You can do it easily with fun and excitement. It would be best if you had some practice and patience. Photoshop has many tools. But the best tool is a pen.
To get the perfect background, you sometimes need to do a minor retouching and color correction. We often use the Magic Wand Tool or the Pen tool to do the job. So, here are some interesting differences and tricks to remove the white background in Photoshop.
As well as the Lasso tool, the Object Selection tool, and the Quick Select tool. Here I describe all the techniques for removing the white background from an image.
How to remove white background in photoshop with a pen tool
It all depends on the image you are working on. Only with practice will you know which tool is best for your job because no two photos are the same.
In addition, each has its advantages, and there is nothing right or wrong if the product is good. Here are some examples of How to remove backgrounds in Photoshop.
Select Pen Tool
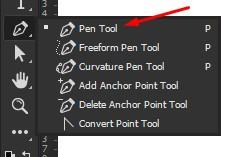
Select Pen Tools from the left Toolbar. You can also use the label “P.” Be sure to set it to “Path” in the top menu.
1.Draw a path
Click anywhere on the edge of the target to create your first anchor point. Create another contact point. If possible, click. If you want a curved line, click and drag to create a curved line.
This allows you to drive smoothly with rounded edges and curves.
2. Convert Path

In the Paths window, hit the “Load path as selection” icon.
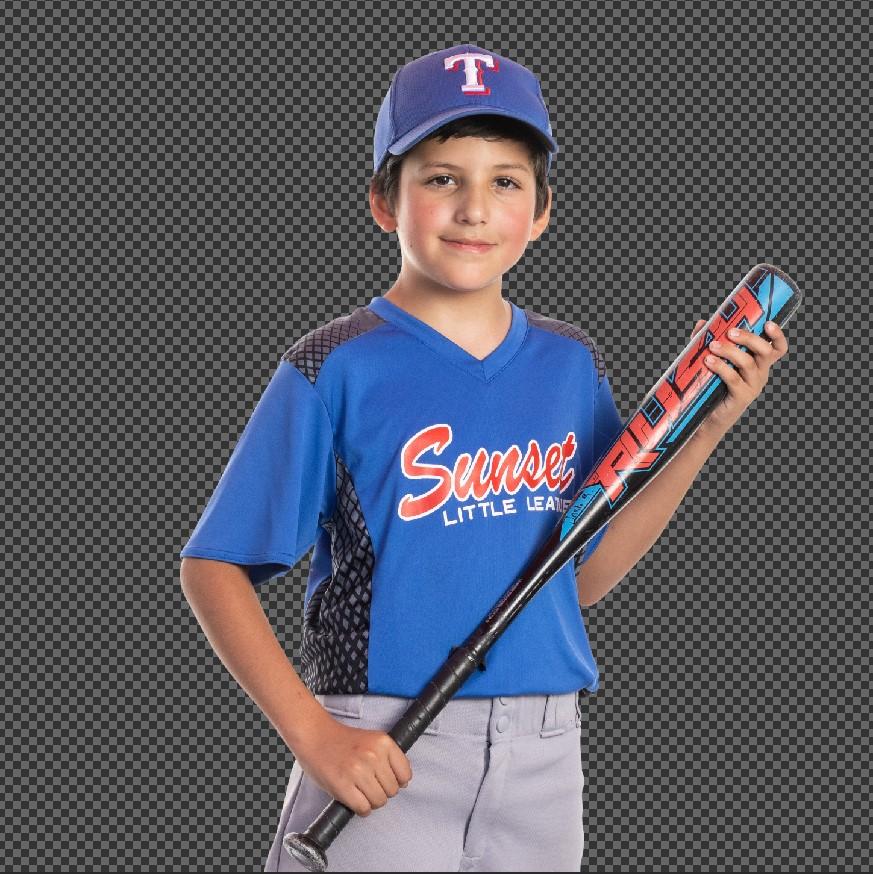
3. Remove White Background in Photoshop
Now there are several options. To remove the background, go to Select > Invert and click Remove. You can also use the keyboard shortcut Cmdr. + Shift + I (Ctrl + Shift + I for Windows).
To copy the theme to a new level, press Cmdr. + J (Ctrl + J on Windows).
And all that, it isolates things and Best Background Removal Service in Photoshop.
Quick selection tool to removing white background in photoshop
I am often asked this question in my seminars and courses: “How can I remove the background of an image?” or “How can I cut my stuff out of a photo and put it on a new background?”
Now you can improve this by simply removing the background. Any photo editor’s secret is using the right tools for the job. In this case, you want to use the quick selection tool to remove objects from the image and place them in another field.
How to use the Quick Select Tool for removing background
In the past, most Photoshop selection tools may have been avoided because they were not easy to use. The speed dial tool has changed everything. Making a choice that doesn’t seem like “cut and paste” has never been easier. There are two levels and sometimes three.
Select a shortcut tool from the Toolbox palette
It’s like a brush, so you can resize the tool using the [-] keys on your keyboard (to zoom in and out). Enter a size for your device that makes it easy to select an item.
Cut Out Your Subject With the Quick Selection Tool
Cut out images to a manageable size to keep your computer running efficiently. For example, resize between 2500 and 3000 pixels on the outer part while practicing or experimenting with ideas. As mentioned above, there are several tools to choose from in Photoshop. But that’s called “fast” for some reason.
Click the Quick Selection tool and drag the cursor over the area you want to select. You will see a row of “parade ants” around the module. Continue adding by dragging the cursor over the area. Not a problem if a little hassle at the beginning. To deselect a large area, hold down Alt (Windows) or Option (Mac) while dragging the cursor around the area you want to delete.
The parade ants will disappear from this area.
Use a Layer Mask
It’s best to work with layers to avoid removing the selection permanently.
This means you can hide parts of your image and then highlight them at any time with the brush.
Revealing Your Selection
Click Layer > Layer Mask > Open Selection at the top of the screen. It’s like “aha!” Your background will disappear, showing the rough shape you’ve chosen.
Select Tricky Areas With Select and Mask
Now you’re wondering: How do you make the Quick Selection tool more accurate? At this point in the process, I’m arranging my photos with the Select & Mask tool. Next, click the layer mask in the layers menu (this is the shape’s black and white outline field). Click Select and Mask at the top of the screen. If you don’t see a button, first make sure you’ve pressed the Quick Selection Tool button.
Adjust the size, hardness, and distance between tools. Then move the cursor slowly to the edge of the image.
The settings for my Highlights and Masks tools depend on my preferences. That’s why it’s a bit of trial and error.
I loved the Select & Mask tool for soft edges or hair. However, I used the brush for the more complex lines (more on that soon).
Use the magic wand to remove the white background photoshop.
Step 1

Open the image and click on the Magic Wand tool on the left Toolbar.
Step 2
It would help if you made some settings changes in this section to do the job correctly. The box on the left highlighted in red indicates the “single option” highlighted when you use the Magic Wand tool for the first time. Next, check the other options in the other red boxes.
Step 3

Now, select the background that you want to erase from the image.
Step 4
To start the process, make sure you unlock the layer from the highlighted area.
Step 5
Now change the magic wand tolerance value to 30 and turn off Continuous.
Step 6
Now, unlock the layer and press DEL to Remove the Background from the image.
Step 7
Please create a new layer and lower it below layer 0. Then fill in the foreground color.
Step 8

Again, select the Magic Wand Tool from the Toolbar to remove the white background in photoshop.
Step 9
Use override to change the priority.
Step 10
After you’ve worked with the subtraction, press DEL to complete the background removal process and save.
How to remove white background in photoshop with the Magic Eraser tool
Essentially, the Magic Eraser tool allows the white background of the image to be erased without interfering with the object on the bus. With Magic Eraser, you must select a fixed part of the image.

The Magic Eraser has many ways to edit and delete a selected area. In addition, it unlocks the background level.
To clean the photo, you can use the eraser tool.
If the Background image has rich colors, you can remove it with one click. You can also remove small objects with the removal tool. You can also enlarge the image. Please note that you are not saving photos in jpg format. This format will replace the transparent background with white. This will go beyond the general purpose of image editing. Instead, navigate to the file and save the image as a PNG.
The transparency of the background will be retained when you save the photo in PNG format.
Remove White Background in Photoshop at Clipping Path Client
If you are looking for the best fundraising service, I recommend you check out Clipping Path Client Inc. You can go through the web. If you think Photoshop is a good provider of editing services and good services, you can place an order or get a price.
You can get two free tests to check the quality. As a result, you may or may not be looking for good service. So I’m talking about white background removal services.
Professional photo shoppers succeed in this business. The Photoshop Pencil tool is used here to delete background images. In addition, you will find quality service, on-time delivery, and a money-back guarantee here.
White Background Removal For Product Photo, Clothing Photos, eCommerce Product Photo, And Others
Removing white backgrounds is vital for products such as articles, fashion accessories, clothing, jewelry, and machine accessories. You can use the above method to remove the white background from your product photos. After removing the original background, you can keep the background transparent or use a solid experience. This gives you flexibility when taking pictures. In addition, if your product image has an inappropriate background, you can remove that background. You can then replace it with the correct background.
Conclusion
In this tutorial, we’ll learn how to remove white backgrounds from Photoshop in different ways using different tools. And we’ve found that we can get the best results with the pencil tool. So always try to remove the white background with a pen for best results. For more Photoshop-related tasks, follow our website and comment if you have questions about this tutorial.
Our Related Content-
Understand The Background Of Outsourcing Bulk Photo Editing Now
The Latest Trend In Best Way To Remove The White Background | CPC