


The Story Of Drop Shadow In Adobe Photoshop Has Just Gone Viral
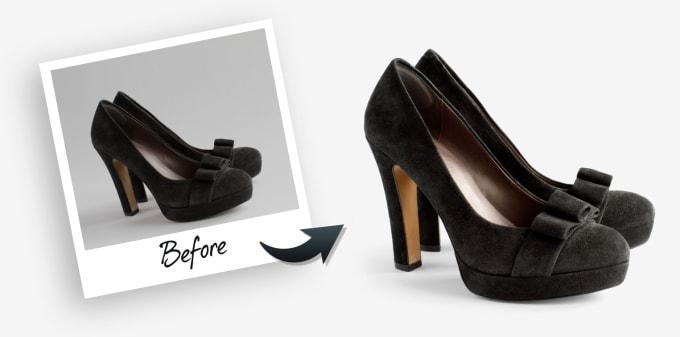
Drop Shadow in Adobe Photoshop- Drop shadow is a dark shape of an image or object. An image Cast Realistic shadow is created when light appears on the image and blocks the light source from different sides to create a shadow.
To create a shadow effect, it needs several sources: sunlight, light bulbs, flashlights, campfires, etc. On this page, we explain how to create distorted shadows in Photoshop and its functions. In addition, we will also be introduced to different types of shadows, realistic shadows, and how to add blur colors to increase the sales speed of your product.
Some Steps to Create Drop Shadow in Adobe Photoshop
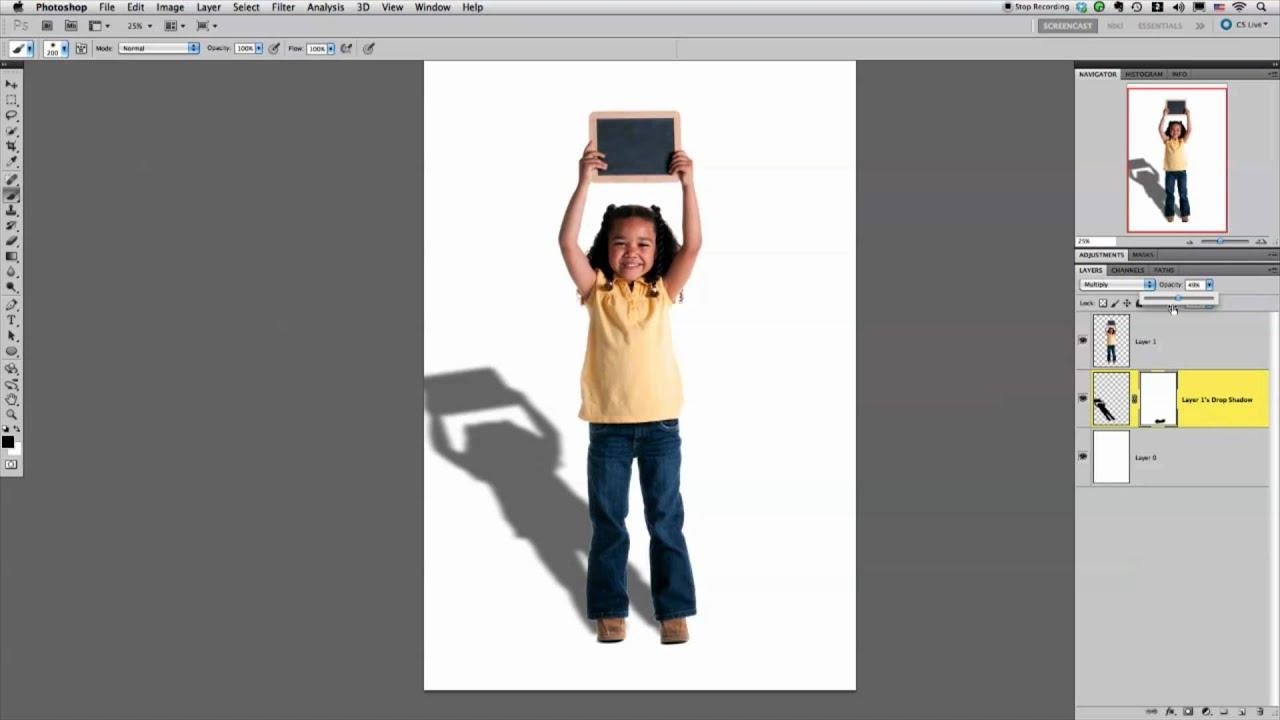
Create another layer from the drop shadow
Isolating the shadow on a new layer will help change, regardless of the image of the product. Do this in Layers> Layer Styles> Create Layer (click OK if a warning dialog box appears).
Twisted the drop shadow
Select the new shadow layer in the Layers panel and go to Edit> Transform> Distort. Now draw the shadow “to the ground” so that your product appears to be casting a shadow on the ground. At this point, having a good sense of lighting and photography helps determine how natural the cast will be, taking into account factors such as shadows on the shape of the product and the length of the cast.
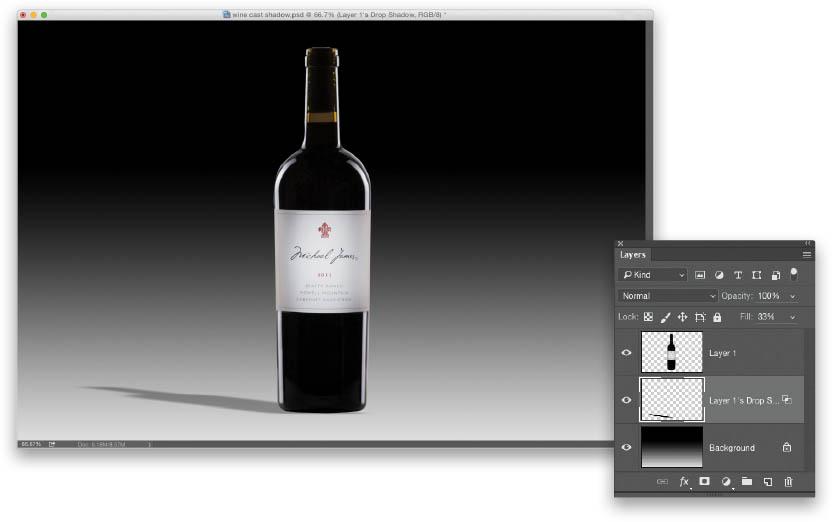
Make sure the shadow hits all parts of the subject that touch the ground. To achieve this, parts of the shadow can be selected and transformed. In the Layers tab, set the Blend Mode of the shadow layer to Normal and Fill to 100%. Use the Rectangle Selection tool to select the shadow area you want to edit, then go to Edit> Transform> Warp to edit it if needed. After applying the changes, use the Brush and Eraser tools to adjust the shaded edges as needed. Finally, change the Blend Mode of the shadow layer to Multiply and reduce the Fill to 75%.
Making the realistic shadow
In real life, the shadow of your product will tend to fade and disappear from the product. Creating an alpha channel can blur and lighten parts of a shadow.
Open the Channels palette (Windows> Channels) and select New Channel from the palette menu. In the context menu, save the default name (Alpha 1) and make sure the rotary knob is selected for the selected area in color views.
Making a gradient
In Channels, the palette selects alpha channel 1. Make sure that the mesh icons are visible for all channels.
Select the Gradient Tool from the Tools palette and make sure the foreground color is set to black and the background color is white at the bottom of the palette.
In the Options palette (at the top of the application window), verify that the gradient is set to black and white and that the gradient type is linear.
Now place the cursor on an extra shadow point or beyond and draw a gradient to the part of the shadow closest to the object (product). You will now see a red gradient above your image.
Blur
You can make the Alpha 1 channel invisible by changing the eye icon next to it. Click on the top channel in the channel palette (RGB or CMYK, depending on the color mode of the image) to select a color channel and deselect the alpha channel.
Make sure the shadow layer is still selected in the Layers palette.
Go to Filter> Blur> Lens Development. Select Verified Preview and select Alpha 1 from the Source in Depth Map drop-down menu.
Set the focal length for blur to 0 and make sure Invert is selected.
Set the radius to a high number (eg more than 60), do not change any other parameters, and click OK.
What is Drop Shadow in Adobe Photoshop?
A Drop shadow is a graphic effect that creates the illusion that a light source is shining on an object from above so that the shadow appears scattered behind the object. A white or very light background is recommended for the best possible rendering of shadows. By placing a gray or black area below and departing from the material, you will look very artistic. Natural Shadow adopts the same theme, but the difference is that it creates the original or natural tone of the image or images.
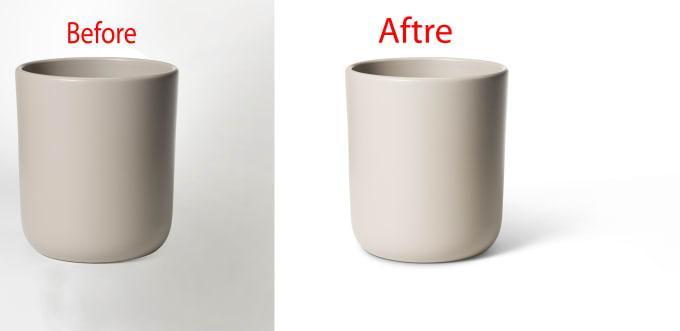
Drop Shadow images are important for e-commerce websites. It is really when a customer sees a product to buy and usually chooses to add it to a checklist, it performs well and looks good. These learning steps are universal Photoshop tactics.
If you follow these steps, you can edit your photos in any version of Adobe Photoshop, but there are some advantages, especially some updated versions such as Adobe Photoshop CC 2020 or 2021. These versions have special results such as excellent output resolution and RGB colors.
How do you add drop shadow in photoshop?
Sometimes a false shadow just needs to fall on the part of the layer or the underlying layer. Maybe the shadow should be on the content of the layer below, but not on the layer below. You need to change the shadow layer effect to a custom layer and edit that layer.
Cut Out Image Subject (Drop Shadow in Photoshop)
Cut out the Image of the raster image before applying the shadow. Always remember that the shadows you add depend only on the selected object. If you don’t crop the object, Photoshop Drop Shadow treats the entire image as an object. And the shading performance is not perfect.
On the other hand, if you try to add this effect to your background layer, you won’t see any changes. Hence, it is best to cut the object first. And add a shadow. In addition, surgical routing services are best suited for objects that are difficult to cut. For subjects with soft eyes, use Image Hide for the best results.
Drop Shadow Settings (Drop Shadow in Photoshop)
Once you have separated the subject from the whole image, it is time to add the shadows. Click the “FX” button at the bottom of the window of the row and another window will open. You can change the settings to match the color of the content. And here’s a Photoshop element on how to add a drop shadow to an object.
Blend Mode
The default merge mode is “Multiply”. And this is to hide the shadow. The general quality of the shadow is darkness. So this method of uniting by multiplication is the way.
Color
You will find the color right next to the Blend Mode option. You can choose any color in the panel and apply it as a shadow. According to the general specifications, the default color is black.
Distance
To set the shadow distance, you need to adjust a bit here. The higher the selected pixels, the farther away the shadow will be. So make sure you choose the perfect distance. Otherwise, the shade will not look natural.
Opacity
You can control the opacity from this panel. The higher the percentage you choose, the darker the shadow. So, 0% opacity means no shadows. And 100% opacity means the darkest shade.
How to Removing Drop Shadow from Image on Photoshop
STEP 1
Choose Filters>Camera Raw filter (Photoshop CC)
In Photoshop CS6, open the file in Camera Raw from Bridge.
STEP 2. SELECT THE SHADOW AREA.
Let’s select the shadow. Choose the Adjustment brush.
STEP 3. REMOVING THE SHADOW AREA.
Now we want the selected area to fit. There are 2 things to keep in mind. Brightness and color.
First, move the Exposure slide until the brightness matches the surrounding area. (Try Shadow slides too)
It looks nice, but notice how the color temperature in the shadows is cooler than in the other pictures.
What is a Realistic Cast Shadow?
With the evolution of Photoshop, we can create a lot of creative work. If the shadow is not in the photo, we can add it as well. From this technique, we can understand how advanced Photoshop is. So let’s get down to business and find out what a realistic shadow cast is.
How to add realistic shadow in photoshop in Detail
Step 1:
You need to remove the background with the tool Remove Background. What can be found in the sidebar? To do this, you must first learn how to clean the story from the images.
Step 2:
After removing the background, you now need to create a default drop shadow. Click Layer -> Layer Style -> Drop Shadow. For a more realistic look, you need to choose the color of the shade. It is supplied in black as standard.
Click on the drop-down dialog, where you will find a black rectangular box on the right-hand side of the merge mode. You will then get the color selection tool. You can also resize to fit and remove other shades in the image. Click OK to adjust.
Drop Shadow Photoshop Definition
On e-commerce sites With this process, you can make photos more attractive to customers. You can also use it on photo pages because professional photographers love this type of photo. This technique can be used to give visual splendor to a natural landscape. The main activity is product photography.
To get a shadow, a second layer is created and the photo is on top of the lower layer, then the resolution of the photo is raised to 72 pixels per inch and a new photo file is created. it’s hard to do the same for sensitive things like hair, etc. But the problem is in the details. However, because there are many specialized services available, you can rely on them for the services you choose.
What I Wish Everyone Knew About Car Photography.| Clipping Path Client